Complete Guide to US Visa for Indian Citizens: 2025-2026


Reviewed by: Professional Visa Consultants team of BTW Visas (US Visa Experts)
📊 Quick Facts & Statistics (December 2025-2026)
Article Summary
US Visa application process, requirements, fees, and policy changes for Indian citizens in 2025-2026
Key Updates:
-
- New $250 Visa Integrity Fee (October 1, 2025) increases total visa costs by 2.5x
- Interview Waiver Program severely restricted (September 2, 2025) - only B-1/B-2 renewals eligible
- $100,000 H-1B fee for new petitions (September 21, 2025), causing 70% decline in approvals
- Social media vetting mandatory for F/M/J visas (June 23, 2025)
- Third-party passport collection ended (August 2025)
- Consular exchange rate increased to ₹92/USD (September 29, 2025)
Are you planning to travel to the United States in 2025 or 2026? Indian citizens face significant changes in US visa policies, fees, and procedures this year. From the new $250 Visa Integrity Fee to stricter interview requirements and the controversial $100,000 H-1B fee, understanding these updates is crucial for your successful visa application.
This comprehensive guide covers everything Indian applicants need to know about US visas in 2025-2026, including the latest policy changes, fee structures, wait times, application procedures, and expert tips to maximize your approval chances.
Note: The visa requirements vary depending on the country's embassy, the applicant's location, profession, special cases, and specific requirements. So it is recommended to consult with a Visa expert to avoid visa rejection or delay.
1. Major Changes to US Visas for Indians in 2026

Critical Updates You Must Know
The US visa landscape for Indian applicants has undergone dramatic transformations in 2025. Here are the most significant changes affecting your application:
1.1 New $250 Visa Integrity Fee (Effective October 1, 2025)
Starting October 1, 2025, the Trump administration's "One Big Beautiful Bill Act" introduced a mandatory $250 Visa Integrity Fee for all non-immigrant visa applicants from countries not on the US visa waiver list, including India.
Key Details:
- Applies to: All non-immigrant visa categories (B-1/B-2, F-1, J-1, H-1B, L-1, and others)
- Effective Date: October 1, 2025
- Non-refundable: This fee cannot be waived under normal circumstances
- In addition to: Standard visa application fees (not a replacement)
- Total Cost Impact: Visa costs have increased by 2.5x for most categories
What This Means for You: A typical B-1/B-2 tourist visa that previously cost around ₹15,540 (USD $185) now costs approximately ₹40,000 (USD $472) when you include:
- Standard visa fee: $185
- Visa Integrity Fee: $250
- I-94 fee: $24
- ESTA fee: $13
1.2 Interview Waiver Program Severely Restricted (September 2, 2025)
The popular "Dropbox" facility that allowed visa renewals without in-person interviews has been dramatically curtailed.
What Changed:
- Before: Many applicants could renew visas through document submission at Visa Application Centers
- After September 2, 2025: Only applicants renewing full-validity B-1, B-2, or B-1/B-2 visas qualify for interview waivers
- New Requirement: Most applicants must now appear for in-person consular interviews
- Consolidation: Interview waiver appointments for B-1/B-2 visas are now consolidated in New Delhi only
Who Still Qualifies for Interview Waiver:
- Tourists renewing full-validity B-1, B-2, or B-1/B-2 visas
- Certain foreign officials and diplomats
- Limited exemption categories
1.3 Consular Exchange Rate Adjustment (September 29, 2025)
The US Embassy in India updated the consular exchange rate from ₹87 to ₹92 per US dollar, increasing the rupee cost of all visa fees by approximately 5.7%.
1.4 Third-Party Passport Collection Ended (August 2025)
New Policy: All visa applicants must now collect their passports and documents in person from the US Embassy or Consulate. Third-party collection is no longer permitted.
Reason: Enhanced security and safety of applicants' passports and documents.
Impact: Applicants must plan for personal pickup, though minors under 14 and adults over 79 may have authorized representatives collect on their behalf.
1.5 Visa Rescheduling Restrictions (January 1, 2025)
New Rule: Applicants can schedule their first non-immigrant visa appointment at any location in India but can reschedule only once.
Purpose: Reduce wait times and ensure fair access to appointment slots.
Strategy: Choose your appointment date carefully, as you have limited flexibility to change it.
1.6 Social Media Vetting Expansion (June 23, 2025)
Mandatory for F, M, and J Visa Applicants:
- All student and exchange visitor visa applicants must set social media accounts to "public"
- Must list all social media handles used in the past 5 years on DS-160 form
- Consular officers will review entire online presence using search engines and databases
- Looking for "potentially derogatory information" including political activism, terrorism support, or anti-Semitic content
Affected Visas:
- F-1 and F-2 (Student visas)
- J-1 and J-2 (Exchange visitor visas)
- M-1 (Vocational student visas)
1.7 H-1B Visa Restrictions and $100,000 Fee (September 21, 2025)
The most dramatic change: A presidential proclamation introduced a $100,000 one-time fee for new H-1B petitions filed after September 21, 2025.
Details:
- Applies to: New H-1B petitions only (not renewals or extensions)
- Exemptions: Existing H-1B holders, renewals, and extensions
- Impact: 70% drop in H-1B approvals for top Indian companies in FY 2025
- Top 7 Indian companies: Only 4,573 H-1B petitions approved (down from 15,000+ in FY 2015)
2. US Visa Types Available for Indians
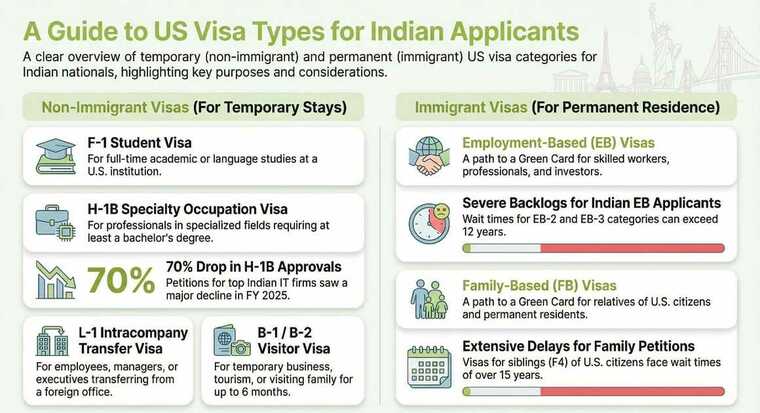
Understanding which visa category suits your purpose is the first step to a successful application. Here's a comprehensive breakdown:
2.1 Non-Immigrant Visas (Temporary Stay)
B-1/B-2 Visitor Visas (Business/Tourism)
- B-1 (Business): Attending conferences, meetings, negotiations, or business consultations
- B-2 (Tourism): Vacation, visiting family/friends, medical treatment, or recreational activities
- Validity: Typically 10 years with multiple entries
- Stay Duration: Up to 6 months per visit (determined by CBP officer at entry)
- Current Fee: $185 + $250 Visa Integrity Fee = $435 total
F-1 Student Visa (Academic Studies)
- Purpose: Full-time study at SEVP-certified US institutions
- Validity: Duration of academic program plus 60-day grace period
- Work Authorization: On-campus work (up to 20 hours/week), CPT, and OPT available
- Total Cost: $535 ($350 SEVIS I-901 fee + $185 visa fee + $250 Integrity Fee)
- Application Window: Up to 365 days before program start date
- Dependents: F-2 visas for spouse and children under 21
J-1 Exchange Visitor Visa
- Purpose: Educational and cultural exchange programs, research, teaching
- Categories: Students, scholars, professors, au pairs, interns, trainees
- Validity: Program duration plus 30-day grace period
- Work: Limited work authorization based on program
- Fee: $185 + $250 Integrity Fee + SEVIS fee (varies by program)
H-1B Specialty Occupation Visa
- Purpose: Employment in specialty occupations requiring bachelor's degree or higher
- Validity: Initially 3 years, extendable to 6 years total
- Annual Cap: 65,000 regular + 20,000 master's cap
- New Fee (Sept 21, 2025): $100,000 one-time fee for new petitions
- Lottery System: Random selection due to high demand
- Dependents: H-4 visas for spouse and children
⚠️ Major Update: H-1B approvals for Indian companies dropped 70% in FY 2025. Only 4,573 petitions approved for top 7 Indian firms.
L-1 Intracompany Transfer Visa
- L-1A (Managers/Executives): Up to 7 years
- L-1B (Specialized Knowledge): Up to 5 years
- Requirement: 1 year employment with foreign company in past 3 years
- Fee: $205 + $250 Integrity Fee + additional employer fees
O-1 Extraordinary Ability Visa
- Purpose: Individuals with extraordinary ability in sciences, arts, education, business, or athletics
- Validity: Initially up to 3 years, extendable
- Requirement: Sustained national or international acclaim
- Fee: $205 + $250 Integrity Fee
M-1 Vocational Student Visa
- Purpose: Vocational or technical training programs
- Validity: Program duration plus 30 days
- Work: Very limited work authorization
- Fee: $185 + $250 Integrity Fee + SEVIS fee
2.2 Immigrant Visas (Permanent Residence)
Family-Based Immigration
- F1: Unmarried adult children of US citizens
- F2A: Spouses and children of permanent residents
- F2B: Unmarried adult children of permanent residents
- F3: Married children of US citizens
- F4: Siblings of US citizens
Current Status for India (December 2025):
- Significant backlogs for all categories
- F2A: Current for most (November 22, 2025 priority date)
- F4: Severe delays (priority dates from 2006-2009)
Employment-Based Immigration
- EB-1: Priority workers (extraordinary ability, outstanding professors, multinational executives)
- EB-2: Advanced degree professionals or exceptional ability
- EB-3: Skilled workers, professionals, other workers
- EB-4: Special immigrants (religious workers, etc.)
- EB-5: Immigrant investors ($800,000-$1,050,000 investment)
Current Status for India (December 2025):
- EB-1: April 15, 2023 (significant backlog)
- EB-2: May 15, 2013 (severe 12+ year backlog)
- EB-3: September 22, 2013 (severe backlog)
- EB-5: Advancing slowly
Note: India is among the "oversubscribed chargeability areas," meaning per-country limits create extensive wait times.
3. New Visa Fees and Cost Breakdown for 2026
3.1 Complete Fee Structure (Effective October 2025)
Visa Category | Base Fee (USD) | Visa Integrity Fee | Additional Fees | Total Cost (USD) | Total Cost (INR)* |
B-1/B-2 (Tourist/Business) | $185 | $250 | I-94: $24 | $459 | ₹42,228 |
F-1 (Student) | $185 | $250 | SEVIS: $350 | $785 | ₹72,220 |
J-1 (Exchange) | $185 | $250 | SEVIS: varies | $435+ | ₹40,020+ |
H-1B (Work - NEW) | $205 | $250 | One-time: $100,000 | $100,455 | ₹9,241,860 |
H-1B (Renewal) | $205 | $250 | - | $455 | ₹41,860 |
L-1 (Intracompany) | $205 | $250 | - | $455 | ₹41,860 |
O-1 (Extraordinary) | $205 | $250 | - | $455 | ₹41,860 |
K-1 (Fiancé) | $265 | $250 | - | $515 | ₹47,380 |
E (Treaty Trader) | $315 | $250 | - | $565 | ₹51,980 |
*Exchange rate: ₹92 per USD (as of September 29, 2025)
3.2 Fee Payment Methods
Accepted Payment Options:
- Online Payment: Credit/debit cards (Visa, MasterCard, American Express)
- NEFT/RTGS: Bank transfer to designated account
- Cash Payment: At authorized Axis Bank branches
Important Notes:
- Fees are non-refundable regardless of visa approval or denial
- Payment receipt valid for 365 days from payment date
- Must pay before scheduling interview appointment
- Keep payment receipt for interview
3.3 Hidden Costs to Consider
Beyond visa fees, budget for:
- Passport photos: ₹200-500
- Document translation: ₹500-2,000 per document
- Travel to consulate: ₹2,000-15,000 (depending on location)
- Courier services: ₹500-1,000
- Medical examination (if required): ₹5,000-15,000
- Travel insurance: ₹2,000-10,000
Total Estimated Cost for B-1/B-2 Visa: ₹45,000-70,000
4. Current Wait Times Across Indian Consulates (December 2025)
4.1 Appointment Wait Times by Location
Consulate | B-1/B-2 Average Wait | B-1/B-2 Next Available | F/M/J Next Available | H/L/O/P/Q Next Available |
New Delhi | 3.5 months | 10 months | 0.5 months | 2 months |
Mumbai | 9.5 months | 10+ months | 2.5 months | NA |
Chennai | NA | NA | 2.5 months | NA |
Hyderabad | 4 months | 5 months | 2.5 months | <0.5 months |
Kolkata | 4.5 months | 5 months | 2.5 months | NA |
Source: US State Department Global Visa Wait Times (Updated November 20, 2025)
4.2 Wait Time Trends and Analysis
Positive Developments:
- Student visas (F/M/J): Significant improvement, especially in New Delhi (down to 0.5 months)
- New Delhi B-1/B-2: Wait times reduced by 50% (from 6.5 to 3.5 months)
- Work visas: Relatively short waits in Hyderabad
Challenges:
- Mumbai: Longest waits for tourist visas (9.5+ months)
- Chennai: Limited B-1/B-2 interview availability
- Interview waiver consolidation: Forcing more applicants to New Delhi
4.3 Strategies to Reduce Wait Times
- Apply Early: Start process 6-8 months before intended travel
- Check Multiple Locations: Availability varies significantly across consulates
- Monitor for Cancellations: Appointments open up regularly
- Consider Emergency Appointments: Available for urgent medical, funeral, or business needs (strict criteria)
- Avoid Peak Seasons: Summer months (May-August) have longest waits
Pro Tip: Use third-party slot monitoring services like CheckVisaSlots.com for real-time availability updates.
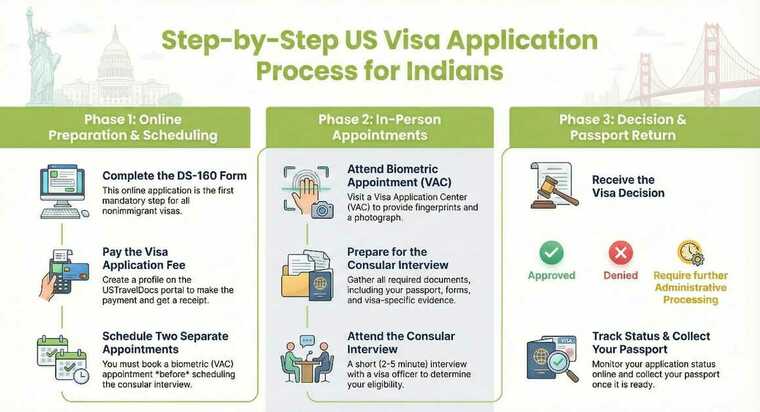
5. Step-by-Step US Visa Application Process for Indians
Step 1: Determine Your Visa Type
Identify the correct visa category based on your travel purpose. Refer to Section 2 for detailed visa types.
Step 2: Complete DS-160 Form
What is DS-160? The Online Nonimmigrant Visa Application form required for all non-immigrant visa categories.
How to Complete:
- Visit: https://ceac.state.gov/genniv/
- Select "New Delhi, India" (or your preferred consulate)
- Fill all sections accurately:
- Personal information
- Travel information
- Previous US travel history
- Family information
- Work/education details
- Security questions
- Social media handles (F/M/J visas): List all accounts from past 5 years
Critical Tips:
- Save application ID to resume later
- Answer all questions truthfully
- Upload photo meeting strict requirements (51x51mm, white background, recent)
- Review carefully before submission
- Print confirmation page with barcode
Common Mistakes to Avoid:
- Inconsistent information with supporting documents
- Incorrect passport number
- Wrong visa category selection
- Poor quality photo
- Incomplete employment/education history
Step 3: Pay Visa Fees
Payment Process:
- Create profile on: https://www.ustraveldocs.com/in/
- Select visa type
- Choose payment method
- Pay fees (base fee + Visa Integrity Fee)
- Save payment receipt (valid 365 days)
Payment Confirmation: You'll receive a receipt with a unique CGI reference number needed for appointment scheduling.
Step 4: Schedule Visa Interview
Scheduling Process:
- Log into USTravelDocs profile
- Enter DS-160 confirmation number
- Select interview location (5 options in India)
- Choose available date and time
- Schedule biometric appointment (VAC) first
- Then schedule consular interview
Two Required Appointments:
- Visa Application Center (VAC): Fingerprints and photo collection
- Consular Interview: At US Embassy/Consulate
Important: VAC appointment must be before consular interview, but can be at different locations.
Rescheduling Policy (Effective January 1, 2025):
- First appointment: Choose any location
- Rescheduling: Allowed only once
- Plan carefully as flexibility is limited
Step 5: Attend Biometric Appointment (VAC)
What to Bring:
- Passport (valid for at least 6 months)
- DS-160 confirmation page
- Appointment confirmation
- Payment receipt
- Recent passport-size photo (if not uploaded)
- Previous US visas (if any)
Process:
- Digital fingerprint scanning (10 fingers)
- Digital photograph
- Document verification
- Duration: 15-30 minutes
VAC Locations:
- New Delhi, Mumbai, Chennai, Hyderabad, Kolkata (free submission)
- Ahmedabad, Bangalore, Chandigarh, Cochin, Jalandhar, Pune (₹1,200 fee)
Step 6: Prepare for Consular Interview
Required Documents (Bring originals + copies):
For All Applicants:
- Valid passport (6+ months validity)
- DS-160 confirmation page with barcode
- Appointment confirmation
- Payment receipt
- Recent passport-size photo (if not uploaded)
- Previous US visas (if any)
For B-1/B-2 (Tourist/Business):
- Employment proof (salary slips, employment letter, ITR)
- Bank statements (6 months)
- Property documents
- Travel itinerary
- Hotel bookings
- Invitation letter (if visiting someone)
- Purpose of visit documentation
For F-1 (Student):
- I-20 form from US university
- SEVIS fee payment receipt
- University admission letter
- Financial documents (bank statements, loan sanction, sponsor affidavit)
- Academic transcripts and certificates
- Standardized test scores (TOEFL, GRE, GMAT, SAT)
- Study plan/Statement of Purpose
For H-1B (Work):
- I-797 approval notice
- LCA (Labor Condition Application)
- Employment letter
- Educational certificates
- Resume/CV
- Company documents
For L-1 (Intracompany Transfer):
- I-129 petition approval
- Employment verification (1 year with foreign company)
- Job description
- Company relationship proof
Step 7: Attend Consular Interview
Interview Day Checklist:
- Arrive 15-30 minutes early
- No electronic devices allowed (phones, smartwatches, USB drives)
- Security screening at entrance
- Bring all required documents in clear folder
Interview Process:
- Security Check: Metal detector, bag screening
- Document Verification: Submit documents at window
- Fingerprint Verification: Quick scan
- Consular Interview: 2-5 minutes with visa officer
Common Interview Questions:
For B-1/B-2:
- Purpose of visit?
- How long will you stay?
- Who will you visit?
- What do you do for work?
- Have you traveled abroad before?
- Who is sponsoring your trip?
- Do you have family in the US?
- What ties do you have to India?
For F-1:
- Why this university?
- Why this course?
- How will you fund your education?
- What are your career plans after graduation?
- Why USA and not India/other countries?
- Do you have relatives in the US?
- Will you return to India after studies?
For H-1B:
- What is your job role?
- What does your company do?
- What is your educational background?
- What is your salary?
- How long have you worked for this company?
Interview Tips:
- Be confident and honest
- Answer concisely and directly
- Don't volunteer unnecessary information
- Maintain eye contact
- Dress professionally
- Speak clearly in English
- Don't argue with the officer
- If denied, ask for reason politely
Step 8: Visa Decision and Passport Collection
Possible Outcomes:
- Approved:
- Visa will be stamped in passport
- Processing time: 2-5 business days (most cases)
- Passport delivery via courier or self-pickup
- Administrative Processing (221(g)):
- Additional documents or verification needed
- Can take weeks to months
- Check status online regularly
- Respond promptly to any requests
- Denied:
- Visa refused under specific INA section
- No refund of fees
- Can reapply anytime (pay new fees)
- Address reason for denial in new application
Passport Collection:
- New Policy (August 2025): Must collect in person
- Exceptions: Minors under 14, adults over 79 (authorized representative allowed)
- Bring government-issued photo ID
- Collection hours: Check consulate website
Tracking Status:
- Check on: https://ceac.state.gov/CEACStatTracker/Status.aspx
- Enter DS-160 barcode number
- Status updates: Application Received → Administrative Processing → Issued
6. Interview Waiver Program Changes (Dropbox Facility)
6.1 What Changed on September 2, 2025
The Interview Waiver Program, commonly known as the "Dropbox" facility, has been severely restricted.
Previous Policy:
- Many visa renewal applicants could skip in-person interviews
- Submit documents at Visa Application Centers
- Faster processing
- Available at all 5 consulates
New Policy (Effective September 2, 2025):
- Drastically limited eligibility
- Only B-1/B-2 renewals qualify (full-validity visas only)
- Consolidated to New Delhi only
- Most applicants must attend in-person interviews
6.2 Who Still Qualifies for Interview Waiver
Eligible Categories:
- B-1/B-2 Visa Renewals:
- Previous visa must be full-validity (typically 10 years)
- Applying for same visa type
- Previous visa expired within last 48 months
- No visa refusals since last visa
- Diplomatic/Official Passport Holders:
- Government officials on official business
- Limited exemptions
Ineligible Categories (Must Interview):
- First-time applicants
- Visa type changes
- Previous visa denials
- Expired more than 48 months ago
- F, M, J, H, L visa renewals (no longer eligible)
6.3 Interview Waiver Application Process
For Eligible B-1/B-2 Renewals:
- Complete DS-160 form
- Pay visa fees
- Schedule "Interview Waiver" appointment in New Delhi
- Submit documents at VAC:
- Passport
- DS-160 confirmation
- Previous visa copy
- Payment receipt
- Supporting documents
- Processing: 2-5 business days typically
- Passport collection: In person (new rule)
Important Notes:
- Embassy may still call you for interview if needed
- Not guaranteed approval
- If called for interview, must appear in New Delhi
6.4 Impact on Indian Applicants
Challenges:
- Longer wait times for appointments
- Increased travel costs (must go to consulate)
- More time-consuming process
- Limited flexibility
Recommendations:
- Apply well in advance (6-8 months before travel)
- Budget for travel to consulate city
- Prepare thoroughly for interview
- Consider emergency appointment only if truly urgent
7. H-1B Visa Updates and $100,000 Fee Explained
7.1 The $100,000 H-1B Fee Shock
On September 19, 2025, President Trump issued a presidential proclamation introducing a $100,000 one-time fee for new H-1B visa petitions—one of the most dramatic changes in US immigration history.
Key Details:
Effective Date: September 21, 2025, 12:01 AM EDT
Applies To:
- New H-1B petitions filed on or after September 21, 2025
- Beneficiaries outside the US without valid H-1B visa
- Petitions requesting consular notification or port of entry notification
Does NOT Apply To:
- H-1B renewals/extensions
- Existing H-1B holders
- Petitions filed before September 21, 2025
- Change of employer (H-1B transfer) in some cases
Fee Structure:
- One-time payment: $100,000 per petition
- In addition to: Standard H-1B filing fees ($460-$780)
- Paid by: Employer (not employee)
- Refundable: Technically yes, but process unclear and takes years
7.2 Impact on Indian H-1B Applicants
Dramatic Decline in Approvals:
According to National Foundation for American Policy (NFAP) analysis:
- Top 7 Indian companies: Only 4,573 H-1B petitions approved in FY 2025
- 70% drop from FY 2015 (15,000+ approvals)
- 37% drop from FY 2024 (7,300 approvals)
- Only 3 Indian companies in top 25 employers for FY 2025
Major Indian IT Companies Affected:
- TCS: 846 approvals (down from 1,452 in FY 2024)
- Infosys: Significant decline
- Wipro: Reduced approvals
- HCL Technologies: Lower numbers
- TechMahindra: Decreased approvals
Why the Decline:
- $100,000 fee makes new hires prohibitively expensive
- Companies shifting to US citizen hiring
- Increased scrutiny and rejection rates
- Lottery system becoming more competitive
- Policy uncertainty deterring applications
7.3 H-1B Lottery and Selection Process
Current System:
- Annual Cap: 65,000 regular + 20,000 master's cap
- Selection: Random lottery
- Registration Period: March (typically)
- Results: March-April
- Filing Period: April-June (if selected)
Proposed Changes (Under Consideration):
- Wage-based selection: Prioritize higher-paid positions
- Elimination of lottery: Merit-based selection
- Stricter specialty occupation definitions
- Enhanced employer compliance requirements
7.4 Alternatives to H-1B for Indian Professionals
Given the challenges, consider these alternatives:
- L-1 Visa (Intracompany Transfer):
- No annual cap
- No lottery
- Requires 1 year employment with foreign company
- L-1A (managers): 7 years
- L-1B (specialized knowledge): 5 years
- Fee: $455 (much lower than H-1B)
- O-1 Visa (Extraordinary Ability):
- No annual cap
- For individuals with exceptional achievements
- Requires extensive documentation of acclaim
- Valid up to 3 years, extendable
- Fee: $455
- E-2 Treaty Investor Visa:
- Requires substantial investment in US business
- No annual cap
- Renewable indefinitely
- India not currently E-2 treaty country (lobbying ongoing)
- EB-1 Green Card (Priority Workers):
- Permanent residence
- No labor certification needed
- For extraordinary ability, outstanding professors, multinational executives
- Long wait times for Indians (currently 2023 priority dates)
- Canadian Immigration:
- Express Entry system
- Provincial Nominee Programs
- Faster processing than US
- Path to citizenship in 3 years
7.5 H-1B Renewal and Extension Process
Good News: Renewals and extensions are exempt from the $100,000 fee.
Renewal Process:
- Employer files I-129 petition
- Pay standard fees ($460-$780)
- No lottery required
- Processing time: 2-6 months (premium processing available)
- Can extend up to 6 years total
Extension Beyond 6 Years:
- Possible if green card process started
- I-140 approved: 3-year extensions
- I-140 pending 365+ days: 1-year extensions
Visa Stamping for Renewals:
- Must visit US consulate in India
- Interview required (no waiver)
- Bring I-797 approval notice
- Processing: 2-5 business days typically
8. Student Visa (F-1) Requirements and Process
8.1 F-1 Visa Overview
The F-1 visa is for international students pursuing academic studies at SEVP-certified US institutions.
Key Features:
- Validity: Duration of academic program + 60-day grace period
- Work Authorization: On-campus (20 hrs/week), CPT, and OPT (12 months), STEM OPT (24 months extension)
- Dependents: F-2 visas for spouse and children under 21
- Application Window: Up to 365 days before program start
- Entry: Up to 30 days before program start date
8.2 F-1 Visa Fees (2026)
Fee Component | Amount (USD) | Amount (INR) |
SEVIS I-901 Fee | $350 | ₹32,200 |
DS-160 Visa Fee | $185 | ₹17,020 |
Visa Integrity Fee | $250 | ₹23,000 |
Total | $785 | ₹72,220 |
Additional Costs:
- University application fees: $50-100 per application
- Standardized tests: TOEFL ($185), GRE ($213), GMAT ($275)
- Document courier: ₹500-1,000
8.3 F-1 Visa Eligibility Requirements
Academic Requirements:
- Acceptance at SEVP-certified US institution
- Full-time enrollment (minimum 12 credit hours/semester)
- English proficiency (TOEFL/IELTS/Duolingo)
- Academic qualifications for program
Financial Requirements:
- Proof of funds for tuition + living expenses
- Typically $40,000-80,000 per year
- Acceptable sources:
- Personal/family savings
- Education loans
- Scholarships/assistantships
- Sponsor affidavits
Intent to Return:
- Strong ties to India
- Career plans post-graduation
- Family connections in India
- Property/assets in India
8.4 Required Documents for F-1 Visa
Essential Documents:
- I-20 Form: Issued by US university (most important document)
- SEVIS Fee Receipt: Proof of $350 payment
- DS-160 Confirmation: With barcode
- Valid Passport: 6+ months validity beyond program end
- Visa Photo: Meeting specifications
- Appointment Confirmations: VAC + interview
Financial Documents:
- Bank Statements: Last 6 months (applicant + sponsor)
- Fixed Deposit Receipts
- Education Loan Sanction Letter: From recognized bank
- Sponsor Affidavit: If sponsored by parents/relatives
- Income Tax Returns: Last 3 years (sponsor)
- Property Documents: If applicable
- Scholarship Letters: If receiving financial aid
Academic Documents:
- University Admission Letter
- Academic Transcripts: 10th, 12th, bachelor's, master's
- Degree Certificates
- Standardized Test Scores: TOEFL, GRE, GMAT, SAT
- Resume/CV
- Statement of Purpose
- Research Papers/Publications: If applicable
Additional Documents:
- Previous US Visas: If any
- Travel History: Passport copies with stamps
- Employment Documents: If working (experience letters, salary slips)
- Family Documents: If family in US
8.5 F-1 Visa Interview Questions
Common Questions:
About University Choice:
- Why did you choose this university?
- Why this specific program?
- What other universities did you apply to?
- Why USA and not India or other countries?
- What is your university's ranking?
About Academics:
- What will you study?
- Why this field of study?
- How does this relate to your previous education?
- What are your career goals?
- What will you do after graduation?
About Finances:
- How will you fund your education?
- What is your sponsor's income?
- Do you have education loan?
- How much will your education cost?
- Can you afford this?
About Ties to India:
- What ties do you have to India?
- Do you have family in the US?
- Will you return to India after studies?
- What job will you do in India after graduation?
- Do you own property in India?
About Future Plans:
- What are your career plans?
- Where will you work after graduation?
- Do you plan to pursue further studies?
- Do you intend to immigrate to the US?
8.6 F-1 Visa Interview Tips
Preparation:
- Know your university and program details thoroughly
- Understand your financial situation clearly
- Prepare clear, concise answers
- Practice with mock interviews
- Organize documents in logical order
During Interview:
- Be confident and honest
- Answer only what is asked
- Don't memorize answers (sound natural)
- Maintain eye contact
- Speak clearly in English
- Don't argue or get defensive
- If you don't understand, ask politely for clarification
Red Flags to Avoid:
- Inconsistent information
- Unclear career plans
- Insufficient financial proof
- Weak ties to India
- Mentioning immigration intent
- Poor English communication
- Lack of knowledge about university/program
8.7 Social Media Vetting for F-1 Applicants (New Requirement)
Effective June 23, 2025:
Mandatory Requirements:
- Set all social media accounts to "public" during application process
- List all social media handles used in past 5 years on DS-160
- Consular officers will review:
- Facebook, Instagram, Twitter, LinkedIn, YouTube, TikTok
- Search engines for your name
- Databases for derogatory information
What They're Looking For:
- Political activism
- Terrorism support or extremist views
- Anti-Semitic content
- Hate speech
- Criminal activity
- Immigration fraud indicators
- Inconsistencies with application
Recommendations:
- Clean up social media before applying
- Remove controversial posts
- Avoid political/religious debates
- Keep profiles professional
- Be consistent with application information
- Don't delete accounts (looks suspicious)
8.8 F-1 Visa Approval Rates and Statistics
Current Trends (2025):
- Overall approval rate: 75-80% for Indian students
- Wait times: 0.5-2.5 months across consulates
- Decline in arrivals: 44.5% drop (August 2024 vs August 2025)
- Reasons for decline:
- H-1B restrictions affecting post-graduation plans
- Increased costs (Visa Integrity Fee)
- Social media vetting concerns
- Economic uncertainty
Top Reasons for F-1 Denials:
- Insufficient financial proof (40%)
- Weak ties to India (30%)
- Unclear career plans (15%)
- Poor academic profile (10%)
- Previous visa violations (5%)
8.9 F-1 Visa Validity and Travel
Visa Validity:
- Typically valid for 5 years
- Multiple entries allowed
- Can travel in and out of US during studies
Travel Requirements:
- Valid F-1 visa
- Valid passport (6+ months)
- Valid I-20 with travel signature (within 1 year)
- Enrollment verification from university
- Maintain full-time student status
Re-entry After Travel:
- Present documents at port of entry
- CBP officer determines admission
- Carry academic transcripts
- Carry proof of enrollment for next semester
9. Tourist Visa (B-1/B-2) Guidelines
9.1 B-1/B-2 Visa Overview
The B-1/B-2 visa is the most common non-immigrant visa for Indians visiting the US for business or tourism.
B-1 (Business Visitor):
- Attending business meetings, conferences, conventions
- Negotiating contracts
- Consulting with business associates
- Attending training (not for credit)
- Estate settlement
B-2 (Tourist):
- Tourism and sightseeing
- Visiting family and friends
- Medical treatment
- Participating in social events
- Amateur sports/music competitions
Key Features:
- Validity: Typically 10 years (multiple entries)
- Stay Duration: Up to 6 months per visit (CBP officer decides)
- Extensions: Possible (apply with USCIS)
- Work: Not permitted
- Study: Short recreational courses only
9.2 B-1/B-2 Visa Fees (2026)
Fee Component | Amount (USD) | Amount (INR) |
DS-160 Visa Fee | $185 | ₹17,020 |
Visa Integrity Fee | $250 | ₹23,000 |
I-94 Fee (land border) | $24 | ₹2,208 |
Total | $459 | ₹42,228 |
Cost Increase: From ₹15,540 to ₹42,228 (2.7x increase)
9.3 B-1/B-2 Eligibility and Requirements
Basic Requirements:
- Valid passport: 6+ months validity
- Purpose of visit: Clear business or tourism purpose
- Intent to return: Strong ties to India
- Financial ability: Sufficient funds for trip
- No immigration intent: Must convince officer you'll return
Strong Ties to India (Critical):
- Employment: Stable job with good salary
- Family: Spouse, children, parents in India
- Property: House, land ownership
- Business: Ownership or partnership
- Financial: Bank balance, investments, assets
- Social: Community involvement, memberships
9.4 Required Documents for B-1/B-2 Visa
Mandatory Documents:
- Valid passport (6+ months validity)
- DS-160 confirmation page
- Appointment confirmation
- Payment receipt
- Passport-size photo
Supporting Documents (Highly Recommended):
Employment Proof:
- Employment letter (on company letterhead)
- Salary slips (last 6 months)
- Income Tax Returns (last 3 years)
- Leave approval letter
Financial Documents:
- Bank statements (last 6 months)
- Fixed deposit receipts
- Property documents
- Investment statements
- Sponsor documents (if sponsored)
Travel Documents:
- Flight itinerary (don't buy tickets before visa approval)
- Hotel reservations
- Travel insurance
- Tour package details
Purpose-Specific Documents:
For Tourism:
- Detailed travel itinerary
- Hotel bookings
- Tour operator details
- Previous travel history (passport copies)
For Visiting Family/Friends:
- Invitation letter from US host
- Host's status proof (copy of passport, visa, green card, or US citizenship)
- Host's address proof
- Relationship proof (photos, correspondence)
For Business:
- Business invitation letter from US company
- Conference registration
- Meeting schedule
- Company profile
- Business card
For Medical Treatment:
- Medical reports from Indian doctors
- Appointment letter from US hospital/doctor
- Cost estimate for treatment
- Payment proof or financial guarantee
Previous Travel:
- Old passports with visas
- Previous US visas
- Travel to other countries (stamps)
9.5 B-1/B-2 Interview Questions
Common Questions:
About Travel Purpose:
- Why do you want to go to the US?
- How long will you stay?
- Where will you go?
- What will you do there?
- Have you been to the US before?
About Employment:
- What do you do for work?
- What is your designation?
- How long have you worked there?
- What is your salary?
- Who will manage your work while you're away?
About Finances:
- Who is paying for your trip?
- How much will you spend?
- What is your bank balance?
- Do you have other sources of income?
About Family:
- Are you married?
- Do you have children?
- Where does your family live?
- Do you have relatives in the US?
- Will your family travel with you?
About Ties to India:
- Why will you return to India?
- What ties do you have to India?
- Do you own property?
- What are your future plans?
For Visiting Someone:
- Who will you visit?
- What is their status in the US?
- How do you know them?
- Where do they live?
- What do they do?
9.6 B-1/B-2 Approval Tips
Increase Your Chances:
- Strong Financial Profile:
- Maintain healthy bank balance (₹3-5 lakhs minimum)
- Show consistent income
- Multiple income sources (salary + investments)
- Property ownership
- Stable Employment:
- Permanent job (avoid probation period)
- Good salary (₹50,000+ monthly)
- Long tenure with company (2+ years)
- Senior position
- Family Ties:
- Married with children in India
- Parents dependent on you
- Joint family setup
- Family business
- Previous Travel:
- Visited developed countries (UK, Canada, Australia, Schengen)
- Returned on time from previous trips
- No visa violations
- Clean travel history
- Clear Purpose:
- Specific travel plans
- Reasonable duration (2-4 weeks)
- Logical itinerary
- Genuine reason
- Professional Presentation:
- Dress formally
- Organized documents
- Confident demeanor
- Clear communication
9.7 B-1/B-2 Denial Reasons and Solutions
Common Denial Reasons:
- Section 214(b) - Failure to Establish Non-Immigrant Intent (Most Common)
- Reason: Officer not convinced you'll return to India
- Solution: Strengthen ties to India, improve financial profile, reapply with better documentation
- Insufficient Financial Resources
- Reason: Cannot afford trip or may seek employment in US
- Solution: Show higher bank balance, sponsor support, stable income
- Lack of Strong Ties to India
- Reason: No compelling reason to return
- Solution: Demonstrate family, employment, property, business ties
- Previous Visa Violations
- Reason: Overstayed previous visa, worked illegally
- Solution: Explain circumstances, show changed situation, wait appropriate time
- Inconsistent Information
- Reason: Discrepancies in application or interview
- Solution: Be truthful, consistent, prepare thoroughly
- Suspected Immigration Intent
- Reason: Officer believes you want to stay permanently
- Solution: Emphasize temporary visit, strong India ties, career plans in India
What to Do If Denied:
- Ask officer for specific reason
- Don't argue or get upset
- Review your application and documents
- Address weaknesses
- Wait reasonable time (3-6 months)
- Reapply with stronger case
- Pay new fees
9.8 B-1/B-2 Visa Validity and Extensions
Visa Validity:
- Typical: 10 years from issue date
- Multiple entries: Unlimited entries during validity
- Stay duration: Determined at entry (usually 6 months)
Important Distinction:
- Visa validity: How long visa is valid for entry
- Stay duration: How long you can stay per visit
- Example: 10-year visa doesn't mean 10-year stay
Extending Your Stay:
If You Need More Time:
- File Form I-539 with USCIS
- Apply before current stay expires
- Fee: $420 (online) or $470 (paper)
- Processing: 2-6 months
- Can stay while pending (if filed on time)
Extension Requirements:
- Valid reason (medical treatment, family emergency)
- Sufficient funds
- No immigration intent
- Maintained legal status
Maximum Stay:
- Generally 6 months per visit
- Extensions possible but scrutinized
- Frequent long stays may raise red flags
10. Document Requirements Checklist
10.1 Universal Documents (All Visa Types)
✅ Passport
- Valid for at least 6 months beyond intended stay
- At least 2 blank pages
- Previous passports (if any)
✅ DS-160 Confirmation Page
- Printed with barcode
- All pages
- Signed
✅ Appointment Confirmation
- VAC appointment
- Consular interview appointment
✅ Payment Receipt
- Visa fee payment
- SEVIS fee (if applicable)
- CGI reference number visible
✅ Photograph
- 51mm x 51mm (2" x 2")
- White background
- Recent (within 6 months)
- No glasses, no smile
- Meeting all specifications
✅ Previous US Visas
- Copies of all previous US visas
- Entry/exit stamps
10.2 Financial Documents
✅ Bank Statements
- Last 6 months
- All pages
- Showing regular transactions
- Healthy balance
✅ Income Tax Returns
- Last 3 years
- Form 16 (if salaried)
- Computation of income
- Acknowledgment receipts
✅ Fixed Deposits
- FD receipts
- Maturity statements
✅ Property Documents
- Sale deed
- Property tax receipts
- Valuation certificate
✅ Investment Statements
- Mutual funds
- Stocks
- Bonds
- PPF/EPF
10.3 Employment Documents
✅ Employment Letter
- On company letterhead
- Designation and joining date
- Salary details
- Leave approval
- Return assurance
- Authorized signatory
✅ Salary Slips
- Last 6 months
- Original or certified copies
✅ Business Documents (If Self-Employed)
- Business registration
- GST registration
- ITR with business income
- Office address proof
- Client contracts
10.4 Family Documents
✅ Marriage Certificate
- If married
✅ Birth Certificates
- For children
✅ Family Photos
- Recent family photos
- With spouse and children
✅ Spouse Documents
- If spouse not traveling: employment letter, salary slips
- If spouse traveling: separate application
10.5 Travel Documents
✅ Flight Itinerary
- Don't buy tickets before visa approval
- Show tentative booking or itinerary
✅ Hotel Reservations
- Tentative bookings
- Cancellable reservations
✅ Travel Insurance
- Coverage for trip duration
- Medical coverage
✅ Travel Itinerary
- Detailed day-by-day plan
- Places to visit
- Activities planned
10.6 Purpose-Specific Documents
For Students (F-1):
✅ I-20 form
✅ SEVIS fee receipt
✅ University admission letter
✅ Academic transcripts
✅ Test scores (TOEFL, GRE, etc.)
✅ Financial documents
✅ Sponsor affidavit
For Workers (H-1B, L-1):
✅ I-797 approval notice
✅ LCA (H-1B)
✅ Employment letter
✅ Educational certificates
✅ Resume
✅ Company documents
For Visitors (B-1/B-2):
✅ Invitation letter (if visiting someone)
✅ Host's documents (status proof, address)
✅ Purpose of visit documentation
✅ Conference registration (if business)
10.7 Document Organization Tips
Best Practices:
- Use Clear Folders: Separate folders for each category
- Arrange Chronologically: Most recent on top
- Label Everything: Sticky notes for quick reference
- Bring Originals + Copies: Officer may keep copies
- Translate if Needed: All documents in English or with certified translation
- Don't Staple: Use paper clips
- Highlight Key Information: Bank balance, salary, dates
- Prepare Summary Sheet: List of all documents with page numbers
Document Checklist Order:
- Passport and photos
- DS-160 and appointments
- Payment receipts
- Financial documents
- Employment documents
- Travel documents
- Purpose-specific documents
- Previous visas and travel history
11. Common Rejection Reasons and How to Avoid Them
11.1 Top 10 Visa Rejection Reasons
1. Section 214(b) - Failure to Establish Non-Immigrant Intent (80% of Denials)
What It Means: Consular officer not convinced you'll return to India after your visit.
Why It Happens:
- Weak ties to India
- Strong ties to US (family, job offer)
- Insufficient financial resources
- Unclear purpose of visit
- Previous overstays
How to Avoid:
- Demonstrate strong employment (stable job, good salary, senior position)
- Show family ties (spouse, children, parents in India)
- Prove property ownership
- Display healthy financial status
- Present clear, temporary travel purpose
- Emphasize career plans in India
2. Insufficient Financial Resources
What It Means: Cannot afford trip or may seek unauthorized employment in US.
Why It Happens:
- Low bank balance
- Inconsistent income
- Sponsor unable to support
- Expensive trip relative to income
How to Avoid:
- Maintain bank balance 6+ months before applying
- Show 6 months of consistent transactions
- Provide multiple income sources
- Get strong sponsor with financial proof
- Match trip cost to financial capacity
3. Lack of Strong Ties to Home Country
What It Means: No compelling reason to return to India.
Why It Happens:
- Unemployed or unstable job
- Single with no family
- No property or assets
- Recent graduate with no job
- All family in US
How to Avoid:
- Secure stable employment before applying
- Show family responsibilities
- Own property or business
- Demonstrate community involvement
- Have clear post-visit plans in India
4. Inconsistent or False Information
What It Means: Discrepancies in application, documents, or interview.
Why It Happens:
- Different information on DS-160 vs interview
- Fake documents
- Exaggerated claims
- Contradictory statements
How to Avoid:
- Be 100% truthful
- Review DS-160 before interview
- Ensure all documents are genuine
- Keep answers consistent
- Don't memorize scripted responses
5. Previous Visa Violations
What It Means: Overstayed previous visa, worked illegally, or violated visa terms.
Why It Happens:
- Stayed beyond authorized period
- Worked without authorization
- Studied on tourist visa
- Misrepresented facts
How to Avoid:
- Always maintain legal status
- Depart before visa expires
- Follow all visa conditions
- If previous violation, wait appropriate time and explain circumstances
6. Suspected Immigration Intent
What It Means: Officer believes you want to immigrate permanently.
Why It Happens:
- Mentioned wanting to stay permanently
- Applied for green card previously
- Family members immigrated
- Weak ties to India
How to Avoid:
- Emphasize temporary visit
- Don't mention immigration plans
- Show strong India connections
- Demonstrate career advancement in India
- Avoid saying "I want to settle in US"
7. Incomplete or Inadequate Documentation
What It Means: Missing required documents or insufficient supporting evidence.
Why It Happens:
- Didn't bring necessary documents
- Poor quality documents
- Outdated documents
- No financial proof
How to Avoid:
- Prepare comprehensive document checklist
- Bring originals + copies
- Update all documents
- Organize systematically
- Anticipate officer's questions
8. Poor Interview Performance
What It Means: Couldn't answer questions satisfactorily or appeared nervous/dishonest.
Why It Happens:
- Nervous and unclear responses
- Contradictory answers
- Couldn't explain purpose
- Poor English communication
- Defensive attitude
How to Avoid:
- Practice mock interviews
- Prepare clear, concise answers
- Stay calm and confident
- Listen carefully to questions
- Answer only what's asked
- Don't volunteer extra information
- Maintain eye contact
9. Criminal Record or Security Concerns
What It Means: Criminal history, security threat, or derogatory information.
Why It Happens:
- Criminal convictions
- Terrorism links
- Fraud history
- Social media red flags
How to Avoid:
- Disclose any criminal history upfront
- Clean social media profiles
- Avoid controversial posts
- Be honest about past issues
- Seek legal advice if concerns exist
10. Administrative Processing Delays
What It Means: Additional background checks or verification needed (221(g)).
Why It Happens:
- Name matches security database
- Need employment verification
- Educational credential check
- Previous country visits
How to Avoid:
- Apply well in advance
- Provide complete information
- Respond promptly to requests
- Be patient (can take weeks/months)
- Check status regularly
11.2 What to Do If Your Visa Is Denied
Immediate Steps:
- Stay Calm: Don't argue or get emotional
- Ask for Reason: Politely request specific denial reason
- Take Refusal Letter: Note the INA section cited
- Don't Demand Explanation: Officer not obligated to explain in detail
After Denial:
- Review Your Case:
- Analyze what went wrong
- Identify weaknesses
- Gather missing evidence
- Address Issues:
- Improve financial situation
- Strengthen ties to India
- Get better employment
- Clarify purpose of visit
- Wait Appropriate Time:
- No mandatory waiting period
- But wait until circumstances improve
- Typically 3-6 months recommended
- Reapply:
- Pay new fees (no refund from previous)
- Submit new DS-160
- Schedule new appointment
- Bring stronger documentation
- Consider Professional Help:
- Immigration attorney
- Visa consultant
- Only if complex case
Important Notes:
- Denial doesn't mean permanent ban
- Can reapply anytime
- Each application judged independently
- Address previous denial reasons
- Don't hide previous denial
12. Expert Tips for US Visa Approval
12.1 Before You Apply
Timing Strategy:
- Apply 6-8 months before intended travel
- Avoid peak seasons (May-August) for faster appointments
- Check wait times across all 5 consulates
- Consider off-peak months (September-November)
Financial Preparation:
- Build bank balance 6+ months before applying
- Show consistent income and transactions
- Avoid large sudden deposits (looks suspicious)
- Maintain balance above ₹3-5 lakhs
- Have multiple income sources
Employment Stability:
- Avoid applying during probation period
- Wait for permanent position
- Get promotion or salary increase
- Build tenure (2+ years ideal)
- Secure leave approval in writing
Document Preparation:
- Start collecting documents 2-3 months early
- Get all documents updated
- Translate non-English documents
- Make multiple copies
- Organize systematically
12.2 DS-160 Form Tips
Accuracy is Critical:
- Double-check all information
- Match passport details exactly
- Be consistent with supporting documents
- Answer all questions (don't skip)
- Save frequently (session expires)
Common Mistakes to Avoid:
- Wrong passport number
- Incorrect dates
- Misspelled names
- Wrong visa category
- Incomplete employment history
- Missing previous travel details
Photo Requirements:
- Exactly 51mm x 51mm
- White background only
- Recent (within 6 months)
- No glasses, no smile
- Face clearly visible
- Professional attire
Social Media (F/M/J Visas):
- List ALL accounts from past 5 years
- Include username and platform
- Don't hide accounts (they'll find them)
- Clean up profiles before applying
12.3 Interview Preparation
Practice Makes Perfect:
- Conduct mock interviews
- Practice with family/friends
- Record yourself
- Work on body language
- Improve English fluency
Know Your Case:
- Memorize key dates and numbers
- Understand your documents
- Know your travel itinerary
- Be clear about purpose
- Prepare for tough questions
What to Wear:
- Formal business attire
- Men: Shirt, trousers, formal shoes (tie optional)
- Women: Formal suit, saree, or salwar kameez
- Avoid casual clothes, jeans, t-shirts
- Look professional and respectful
What to Bring:
- All required documents
- Organized in folders
- Originals + copies
- Nothing else (no bags, phones, electronics)
12.4 During the Interview
First Impressions Matter:
- Arrive 15-30 minutes early
- Be polite to everyone (security, staff)
- Greet officer with smile
- Stand straight, confident posture
- Make eye contact
Communication Tips:
- Speak clearly and confidently
- Answer in English (unless asked otherwise)
- Be concise (don't ramble)
- Answer only what's asked
- Don't volunteer extra information
- If you don't understand, ask politely
Body Language:
- Maintain eye contact
- Don't fidget or look nervous
- Keep hands visible
- Smile naturally
- Stand/sit straight
- Appear confident but not arrogant
Handling Difficult Questions:
- Stay calm
- Think before answering
- Be honest
- Don't get defensive
- If you don't know, say so
- Don't make up answers
Red Flags to Avoid:
- Mentioning immigration intent
- Saying you want to work illegally
- Contradicting your documents
- Getting angry or argumentative
- Appearing dishonest
- Showing desperation
12.5 Specific Visa Type Tips
For B-1/B-2 (Tourist/Business):
- Emphasize temporary visit
- Show strong India ties
- Have clear return date
- Demonstrate financial ability
- Bring invitation letters
- Show previous travel history
For F-1 (Student):
- Know your university and program well
- Explain career goals clearly
- Show sufficient funding
- Demonstrate intent to return
- Bring academic documents
- Be prepared for social media questions
For H-1B (Work):
- Understand your job role
- Know your employer
- Bring I-797 approval
- Show educational qualifications
- Explain specialty occupation
- Be aware of $100,000 fee (if new petition)
For L-1 (Intracompany Transfer):
- Prove 1 year employment
- Explain company relationship
- Show specialized knowledge
- Bring employment verification
- Demonstrate managerial role (L-1A)
12.6 Post-Interview
If Approved:
- Visa stamped in passport
- Processing: 2-5 business days typically
- Track status online
- Collect passport in person (new rule)
- Check visa details for accuracy
If Administrative Processing (221(g)):
- Additional documents needed
- Can take weeks to months
- Respond promptly to requests
- Check status regularly
- Be patient
If Denied:
- Don't panic
- Ask for reason
- Review your case
- Address weaknesses
- Wait and reapply
12.7 Insider Secrets
What Visa Officers Look For:
- Credibility: Are you telling the truth?
- Intent: Will you return to India?
- Ties: What connects you to India?
- Finances: Can you afford the trip?
- Purpose: Is your reason genuine?
What Impresses Officers:
- Stable, well-paying job
- Property ownership
- Strong family ties
- Previous international travel
- Clear, confident communication
- Well-organized documents
- Genuine purpose
What Raises Red Flags:
- Nervousness or evasiveness
- Inconsistent information
- Weak financial profile
- No ties to India
- Vague travel plans
- Poor English (for student visas)
- Suspicious documents
Consulate-Specific Tips:
- New Delhi: Strictest, most experienced officers
- Mumbai: High volume, faster interviews
- Chennai: Tech-savvy applicants, student-friendly
- Hyderabad: IT professionals, shorter waits
- Kolkata: Smaller volume, personalized attention
Conclusion
Navigating the US visa process for Indians in 2026 requires careful planning, thorough preparation, and understanding of the latest policy changes. The introduction of the $250 Visa Integrity Fee, restrictions on interview waivers, and the dramatic $100,000 H-1B fee have significantly altered the landscape.
Key Takeaways:
- Start Early: Apply 6-8 months before intended travel
- Budget Appropriately: Visa costs have increased 2.5x
- Strengthen Your Profile: Focus on ties to India, financial stability, and clear purpose
- Prepare Thoroughly: Organize documents, practice interviews, know your case
- Stay Updated: Policies change frequently; check official sources regularly
- Be Honest: Truthfulness is critical for approval
- Don't Give Up: Denial isn't permanent; address issues and reapply
Official Resources:
- US Embassy India: https://in.usembassy.gov/visas/
- US State Department: https://travel.state.gov/
- USCIS: https://www.uscis.gov/
- Appointment Scheduling: https://www.ustraveldocs.com/in/
- Visa Status Check: https://ceac.state.gov/CEACStatTracker/Status.aspx
Need Help?
- Email: support-india@usvisascheduling.com
- Phone: +91 20 69020000 (from India) | +1 332 220 1866 (from US)
- Wait Times: https://travel.state.gov/content/travel/en/us-visas/visa-information-resources/global-visa-wait-times.html
Remember, every visa application is unique. This guide provides comprehensive information, but your specific circumstances may require additional considerations. When in doubt, consult official sources or seek professional immigration advice.
Good luck with your US visa application! 🇺🇸
About This Guide:
This comprehensive guide was last updated on December 2, 2025, and reflects the latest US visa policies, fees, and procedures for Indian applicants. Information is sourced from official US government websites, embassy announcements, and verified immigration resources.
Disclaimer: Visa regulations can change without notice. Always verify current requirements through official US government sources before applying. This guide is for informational purposes only and does not constitute legal advice.
Content Accuracy: This comprehensive guide has been compiled based on extensive research of official government sources, verified travel information, and real experiences of Indian travelers who have successfully obtained Albania visas.
Expert Contributors: BTW Visas experts team with 15+ years of industry experience, with a 99% visa success rate, and have processed more than 4 lakh+ Visas.
Frequently Asked Questions
Is there an E-visa option for Indian citizens?
There is no E-visa option available for Indian citizens applying for a US visa. The entire process is traditional and requires going through the US embassy or consulate in India.
How long does it take to process a US visa for Indian citizens?
Processing times can vary significantly depending on the visa category, location of application, workload at the embassy/consulate, and seasonality. It can range from a few days to several months, or even exceeding a year for some work or student visas.
Can I renew my US visa without an interview?
Yes, under certain circumstances, you might be eligible to renew your US visa without an interview. This applies if:
- Your current visa is still valid or expired within the past 48 months.
- Your visa class is B1/B2, B1, or B2 (business and tourist visas).
What happens if my US visa application is rejected?
There can be various reasons for rejection (incomplete application, ineligibility, insufficient funds, etc.). The US Department of State website offers information on ineligibility. Consider consulting with an immigration attorney for guidance if your application is rejected.
How much will a USA visa cost me?
The cost of a US visa for Indian citizens depends on two fees: the visa application fee (varies by visa category) and the interview fee (usually ~$120)
Do I need a visa if I have a passport?
Having a passport doesn't guarantee you won't need a visa. A passport simply verifies your identity and citizenship, but a visa acts as an official permit to enter a specific country.
Whether you need a visa depends on the regulations of the country you're visiting and your nationality.
How can I get a US visa from India?
- Visit the US Department of State Website:
- Prepare Your Documents
- Complete the DS-160 Online Form
- Schedule Your Interview Appointment
- Pay the Visa Application Fee
- Interview for the Visa
- Await for the decision
- Claim your Visa
How much bank balance is required for a US visa?
There's no minimum bank balance requirement set by the US for visa applications. However, we recommend you to keep $6,000 to $10,000 USD, this range is often cited as a starting point for showing sufficient funds for a US visa application, especially for tourist visas.
Can I get a 10 year visa for the USA?
Yes, some US visas issued to Indians can be valid for 10 years, like B1/B2 tourist visas and B1 business visas. This doesn't guarantee a 10-year stay per visit, and renewal might be possible without an interview under certain conditions. However, the validity period is ultimately at the visa officer's discretion.
Can I use my father's bank statement for a visa?
Your father's bank statement can be a supporting document for a US visa application, but not the primary one. Include it with a sponsor letter stating his willingness to financially support your trip and proof of his sufficient funds. Focus on showing your own ties to India and financial stability for a stronger application.
Do I need a visa to visit the United States?
Yes, most foreign nationals, including Indian citizens, need a visa to enter the United States. However, citizens of certain countries are eligible for the Visa Waiver Program (VWP), allowing them to travel to the US for tourism or business purposes without a visa for stays of up to 90 days.
How to apply for a United States visa?
To apply for a US visa, Indian citizens need to complete the online visa application form (DS-160) or contact Authorized Visa Service Center, schedule an interview at the US Embassy or Consulate in India, pay the visa application fee, and attend the visa interview.
How to get a visa for United States?
To obtain a US visa, Indian citizens must follow the application process outlined by the US Embassy or Consulate in India. This typically involves completing the online visa application form, scheduling a visa interview, paying the visa application fee, attending the interview, and providing required documentation.
Can a student get a tourist visa in United States?
While it is possible for students to apply for a tourist visa (B-2 visa) to visit the United States for leisure purposes, it's essential to demonstrate strong ties to their home country and a genuine intent to return after the visit. Students should consult with the US Embassy or Consulate in India for guidance on the visa application process.
Do Indian citizens need transit visa for United States?
Indian citizens transiting through the United States to a third country generally require a transit visa (C visa) unless they qualify for an exemption. However, passengers transiting through certain US airports may be eligible for the Visa Waiver Program (VWP) or the Transit Without Visa (TWOV) program. It's advisable to check with the airline and US authorities for specific transit visa requirements.